The Best Online Casinos in 2024

Online casinos, one of the fastest growing industries in this century, continue to revolutionize the iGaming sector, with hundreds of operators joining the existing ones. Hence, more casino news and publications are making waves. Gamers have hundreds of choices to make regarding choosing the best sites to play at, and at the same time, this could be a very challenging decision for them. Choosing the best and most online casinos in 2024 may look challenging for starters. This is because new operators are increasing. This online casino review will dig more and determine the best among them.
Best online casino
We have selected the list of best online casino gambling sites in 2024 for players based on our rating. We considered their services and other vital factors to conclude they are the best. This review will talk about the best online casinos.


Get up to €/$200 Welcome Bonus 100% + 20 FS.


Review Of the latest Casino Websites to Avoid
It can be heartbreaking believing that you have found the perfect operator for your gaming needs, only to discover you are far from the perfect operator. As you search for the best online casinos, you must avoid the following operators. Here is a short review of the latest casinos to avoid.
| 21 Dukes (Rating: 1.4/10) | BALZAC Casino (Rating: 1.5/10) | Planet 7 Casino (Rating: 1.2/10) |
| Several reports about withholding winnings. Questionable license. Bad customer support team that takes longer to respond to issues. | The casino site can hold winnings for more than a year, preventing users from withdrawing. Accounts are usually kicked out. The customer support team does not reply to queries on time. | The site offers an abysmal customer service. There are many untrustworthy gambling practices connected to the operator. Casino withholds players’ winnings. |
Review of the Criteria for Choosing the Best Online Casino
The best new online casinos can be narrowed down to individual preferences because the player knows what he finds at the preferred casino. Here, we will talk about some crucial factors to consider when deciding on the casino to play at. We will review the criteria to watch out for before choosing an online casino:
- Game fairness.
- Preferred Games.
- Multiple options to replenish your account.
- Customer Service.
- Ensure the Play Experience matches your need.
- Site Security.
- Licensing.
- Problem Gambling.
Casino Review and Rating: The process we considered to review and rate online casinos

Before we rate and review any casino, we consider certain factors that help us arrive at a logical rating. These factors may be available in one casino but missing in another. These factors contribute immensely to the services an operator offers. Our rating and review are based on the following factors:
Casino Bonuses and Promotions
Casino bonuses and promotions are unique services that sell an operator. Real online casinos operators offer bonuses, including reload, referral, welcome, VIP programs, and more. We focused on these aspects to determine the ratings of an operator. Moreover, we considered the playthrough requirements and higher bonus limits.
Banking Experience
We prefer any casino that offers transactions and payments in fiat currency and cryptocurrencies for bettors who love real-money gaming. From credit cards to Bitcoins, punters must enjoy unlimited access to an online casino deposit. Moreover, using them should come with zero to low charges. These options should also support fast and high payouts for users.
Mobile Gaming
Our lists of rated casinos in this guide allow bettors to play via mobile. Interestingly, we even found many of them have their dedicated mobile casino app for an improved experience. It is almost impossible not to see an operator that doesn’t offer mobile-compatible casino services.
Therefore, players do not need to struggle or play at an online casino that doesn’t support mobile gameplay. All our rated and reviewed casinos are not only real money spins casinos but also allow bettors to access them from their mobile devices anywhere.
Fast Payouts
There is no point in delaying players’ winnings; therefore, we checked the payout time for payment processing. Incredibly, the best online casinos with e-wallets and crypto casinos are the fastest regarding disbursing players’ winnings.
Deposit and Contact Customer Support
To ascertain the speed of deposits at these casinos, we funded accounts. While we believe that a casino must feature different payment options, we cannot also downplay the fact that deposit transactions should be free of charge. We contacted the support teams to determine the speed of their responses, how they attended to queries, and how soon they solved them.
Play games and withdraw funds
We reviewed some games at these sites by playing them to ascertain what players’ experiences would feel like. We tried several real money games we could lay our hands on. We also played some free games to understand how they work. At the end of the game, we attempted to withdraw our winnings to ascertain withdrawal speed, convenience, response, and different available methods.
Safety and Reputation
As mentioned, having a license doesn’t mean players are completely safe at a casino. To further verify the importance of these licenses, we carefully went through each site we recommended in this article by checking out their SSL certificates. This ensures that players are fully secured from threats. Also, we thoroughly researched user feedback and ensured that every casino that made our online casino guide was reliable.
Percentage on Payouts
Percentage on Payouts is the money fraction gamblers get from the operator over some period. On the other hand, players enjoy increased winning potential. While it may sometimes be challenging to assess the payout percentage of casinos, we took time to deeply evaluate the average operator payout by observing the RTP of several casino games.
We considered different selection processes, and we narrowed it down to payouts above 96% of all punters’ stakes, which offers an immersive gaming experience.
Publish Review and Add to Recommended List
After fulfilling all the above processes, we concluded our findings. We ensured that every aspect we reviewed passed through stringent quality checks before we publicized it. However, it is pertinent to say that if a casino meets all our review conditions, it will make it to our casino-recommended best casino sites.
If a casino is below our expectations, we deem it fit to blacklist it. If a casino makes our recommended list, that isn’t the final, as we will always check to see if it has derailed from the features that qualify it in the first place.
Such a casino with dwindling service quality will be added to our list to avoid. We are concerned with ensuring that these casinos do not slip from the quality services they offer. Lastly, a below-par casino can also make it to our list if we revisit and find it has leveled up its services.
New online casino


Get up to €/$200 Welcome Bonus 100% + 20 FS.

A Review of Which Is the Best Casino Website
We have reviewed so many casinos in the last few years, but regarding which is the best among these operators, none comes closer to 1xbet. Here is a short review of the casino.
1xbet is one of the most sought-after casinos, not only in European countries but also in African nations among bettors. Many features set this bookmaker apart from the rest, and it keeps introducing more jaw-dropping features to provide gamers with an incomparable gaming experience at its online casino live.

Its gaming section is one of the best you will ever find, offering the latest sophisticated games. From casino slots to poker and roulette to live dealers, 1xbet is the real deal for gamers who love different casino game genres. The positives of 1xbet casino are endless. Users can enjoy free phone support and transact in different currencies they want, even on a single account.
1xbet offers multiple options for recruits to register at the site, such as one-click, phone number, email, and users’ social network. The registration process at the site is easy and super fast, and you can complete it within a few seconds. Regarding the gaming sections, players have unlimited options. The slot section alone has thousands of games. Punters also enjoy intriguing welcome bonuses and user-friendly ongoing promotions at the site.
There is a mobile app for 1xbet for players who find it uncomfortable playing via native browsers. Both options are optimized to the best taste of users. Online casino slots and other casino games online at this site have friendly RTP, and players can enjoy the best return on their stakes. 1xbet offers top-notch support team services, so even if players experience a glitch, they can solve it quickly by contacting them. There is an array of contact channels on the website, allowing users to choose the best options.
The site features effective, responsible gambling online casino measures to help players curb problem gambling. Time limits, cool-off, and self-exclusion are some measures at 1xbet.
Overall, our review of 1xbet showed that it is one of the safest and most secure sites ever reviewed. The casino is licensed in Curacao. In Kenya, the casino holds a BLCB license, which means players are secure at the site, playing from home or abroad.
The Top 6 Trusted Online Casinos Review
There are many online casinos, but certain features set them apart. However, this review will be based on the six most reliable online casinos according to our expertise. Here are the top 6:
| Rank | Casino name | Bonus offers | Available games at the casino | Payment speed | Win Rate/ Percentage (%) |
|---|---|---|---|---|---|
| 1 | 1xbet | 200% First deposit + 150 Free spins | +3000 | 24-48 hours | 96.95% |
| 2 | Betway | $1,500 | 400+ | 24-48 hours | 98.16% |
| 3 | 888 | $1000 | +2,000 | 24-48 hours | 96.87% |
| 4 | Bet9ja | 100% up to 100,000 | 500+ | 24-48 hours | 97.12% |
| 5 | Parimatch | Up to £50 | +200 | 48 hours | – |
| 6 | Europa Casino | 100% up to €2,400 | 1000 | 24-48 hours | 98.26% |
The Review of the best online casinos in October 2024
The gambling market is highly competitive, and despite the growing competition, some fantastic operators have come out to top others. As of October 2024, we have taken the time to review the best online casinos for gamers. The below review will reveal the big names that made it to our best online casinos for October.
Unarguably, 1xBet was the best online casino in January 2024.
Betway: If you are just starting casino gambling or you have acquired enough casino gambling experience, Betway is worth checking out. Hence, the reason it remains one of the top casinos in 2024. New users who sign up with this casino and fulfill the first-time deposit requirement will get up to a $1,500 bonus.
| Casino Operator | Operator Name |
|---|---|
| 1xBet | Best for Casino games collection |
| Betway | Welcome bonus |
| 888 | Online casino app |
| Mozzartbet | High payouts |
| Betwinner | Support team |
| 22Bet | The best Blackjack |
| 1xBet | The best online casino Slots site |
| Europa Casino | The best for safety |
Review online Casino Rules: How to play online casino top games
The thrills of playing at online casinos can never be underestimated. However, certain processes are required before players can play at any of our best-recommended sites. We will review below the steps required to play at the best casinos.
- Choose any of our recommended best casinos.
- Sign up at the selected preferred casino sites by filling in all demanded information.
- Verify your account and log in to your new account.
- Fund your account if you are playing for real money.
- Explore the games libraries to choose which game to play.
- Launch the game to start and wait for the outcome.
Online Casino Games Types Review
The best gambling site will feature the latest and most sophisticated games for its users. An array of casino games means users will not be confined to a few available games. In this section, we will review the mandatory and popular games an online casino must have for players to enjoy playing on the site.
Roulette
All betting casino operators must understand that Roulettes are one of the most popular casino games, hence the need for them to feature it on their websites. These games are sometimes called “games of luck” because anyone attempting to play them must come alongside luck. It is based on forecasting where a ball will land. If a player predicts correctly, the site offers cash prizes depending on the stake. Roulettes have different types, such as American, European, and French. A no-zero roulette would be perfect for players, especially if unfamiliar with the game.
Slots
Unarguably, no casino can be famous in the casino industry without featuring slots on its site. It is the most popular among other types of casino games. Like roulette, gamers will also need luck to win. Anyone can learn how to play casino slots, and they are available in thousands at the best online casinos. If you are starting as a slot enthusiast, it is recommended to begin with simpler 3-reel slot machines. An experienced slots player would not be a novice playing 5-reel video slots with different features.
Progressive jackpot slots
Here comes another popular online casino game that could change the financial status of a player within a few seconds. Mega Moolah, Mega Fortune, and more are categorized under progressive jackpot slots. They are usually associated with jaw-dropping prizes for players, which increase the more gamers play. With massive Jackpots at the site, a player could become one of the wealthiest with a single reel online casino free spins. These slots are so lucrative that they come with a huge sum. However, progressive jackpot slots share one thing in common with other slots; luck!
Video poker
This online game is a combination of poker fun with a random slot machine nature. As such, chances of winning an event with video poker come from the casino. Getting a royal flush sometimes offers a fantastic chance to win a considerable sum. Whether you win or not, video poker is designed to offer gamblers one of the best casino gaming experiences at any top casino site.
Poker
Poker is one of the games with massive players, and you would find them at almost every top casino site. This game works because players go against each other to try out playing them, scooping the whole cash as they play. Casinos also offer poker, where gamers can play games like three-card poker. Another popular one is Caribbean Stud Poker. These games allow users to play against the dealer. Apart from being a popular online game, they are common at land-based casinos.
Blackjack
A great online casino would do everything to incorporate Blackjack as it is one of the top 10 online casino games. It is one of the favorites of casino gamblers. Playing this game means players combine skill and luck for the best outcome. Blackjack allows users to play different stakes. Some online blackjack titles have been very famous among users, such as Blackjack Switch and Blackjack Surrender. They are just a few among other Blackjack games that offer exciting gaming moments.
Live Dealer Games
Do you have what it takes to take on a real dealer? Well, you can find out when you play live casino dealer games at the best online casinos. Although these games are the most recent to join casino gaming, they have developed a considerable fan base. This game demands players to have a webcam beamed to their screen to enjoy a more realistic online gaming experience. An average online casino will offer a minimum of live online casino blackjack and roulette. Some operators also feature Baccarat and poker in their live casino gaming sections. However, you will need to stake higher playing any live casino online games, unlike the standard casinos.
Sports Betting
The best bookmaker features a sport betting virtual & casino. Arguably, it is the most popular form of betting, with millions of fans worldwide. Bettors participate in casino bets on different daily events under sports betting.
Soccer has the highest number of bettors because there are hundreds of market options to wager on. From high-quality club league games to international competitions, users cannot get enough sports betting. If you have the best knowledge about sports, you could win a decent sum. Although sports betting often works with statistics, you may also need some luck.
Other Games Review
The best and top online casinos will not limit their casino games to the genres discussed above. Players must also enjoy games like scratchcards. Keno and Bingo are other games the best casinos must have in their gaming libraries. Finally, players can make a good decision regarding choosing an operator to play with by researching deeply about the games it offers. This will help you understand if it is right for you or not.
Review of benefits of Real Money Online Gambling
Have you ever considered the massive benefits of playing real money online gaming beyond monetary gains at casinos? Well, lots of benefits come with real money online gambling. In this section, we will review more reasons to engage in real casino online gaming.
Types of Casino Bonuses Review
Bonuses at casinos stand tall among other bait best casino sites used to woo players. At the same time, they are rewards for welcoming recruits to a betting site. This review will be based on some types of bonuses gamers can expect at top casino sites. All bonus types are unique, so they offer unique applications too.
Welcome (Sign-Up) Bonus. Unarguably, this is the most famous among other bonuses at top casino sites. Casinos design them to appreciate new players on their site. Casinos release this bonus as a match bonus form, ensuring it matches one’s initial deposit percentage. Players can use them for different casino betting. It provides players an extended playing time to familiarize themselves with the operator more. The bonus could also be in the form of casino free spins.
Big Welcome Bonuses Casino:
| Casino | Welcome offer | Playthrough Requirements | No-deposit Bonus |
|---|---|---|---|
| 1xBet | 200% First deposit + 150 Free spins | 35x | N/A |
| Betway | $1,500 | 30x | N/A |
| 22Bet | 100% deposit match bonus | 50x | N/A |
| 888Bet | 100% deposit bonus+88FS | 30x | Yes |
| Casino.com | 100% up to £50 | 40x | N/A |
Reload Bonus. If a player is committed to an operator for a long time, the player receives compensation in bonus for his loyalty. This refers to the reload bonus for a player’s continuous deposits. Similar to a welcome offer, players get a reload bonus at an old and a new online casino at an extra percentage of the amount they deposit. However, reload bonuses are available to bettors more than the initial deposit amount. They are effective for boosting one’s bankroll and enjoying extra gameplay like a spin casino.
No-Deposit Bonus. The name says it all! You don’t have to deposit before qualifying for this perk at the best casinos. No deposit is designed for new users, allowing them not to risk their money. This offer usually follows a complete sign-up, giving users a portion for spin and win cash games. It is not easy to get this bonus type.
Refer-a-Friend Bonus. Invite a friend, and get a bonus for that. This is just what the referral bonus means. It is a way to appreciate your effort in bringing someone new to a top casino site. When your referral signs up and funds the account, the casino sends a bonus that equals his deposit percentage. It is a win-win situation for you and your friend.
Extensive Games Selection
There is no point in playing at a gambling site with limited games. A real-money online casino would have many games to cater to gamers’ needs. Slots, tables, and other electrifying games must not be scanty on an online casino real money.
High RTPs
High RTPs are an excellent way for players to enjoy gaming at online casinos. This feature lets gamers win whenever they play. The best casino online offers incredible RTP and can range from operator to operator. Video poker is one of the online casino games with fantastic RTPs.
Massive Potential Prizes
The potential to win huge prizes is why people play games at online casinos. Although some win little sums while playing, others can be fortunate by hitting the highly coveted jackpot worth millions. Jackpots are life-changing online casino real money.
Reliable Customer Support Service
A reliable support team should not be a missing feature at best money online casinos. Users must have a responsive team on the ground to solve any problems regarding casino gambling.

Stable Software Compatible with All Devices
The revolution in the casino industry has increased the number of mobile games, allowing gamers to play their favorite casino games anywhere. Real-money casino online offers stable software that works perfectly with all devices.
Payment Methods
A secure online casino allows gamers to put money into betting accounts in multiple ways. These methods are also available for withdrawing their winnings. Below is a tabular review of the payment methods available at the best online casinos. The review will also show the transaction processing time of the best casinos.
| Payment Options | Average charges in % or $ | Average time/days to deposit | Average withdrawal time |
|---|---|---|---|
| Credit/Debit cards | 0.3 | Instant | 1-5 days |
| E-wallets | 0 | Instant | 1-48 hours |
| Bank Transfers | 0-50 | 1-5 | 5-15 days |
| Cryptocurrencies | Variable | Almost immediately | 1-24 hours |
| Prepaid Cards | 0-50 | Instant | N/A |
Review of mobile Casinos at top online casino sites
Smartphones make online gaming more straightforward and more accessible than before. Here is a review that talks about mobile casinos online for players.
Nobody loves it if they are confined to a specific location regarding playing games. The introduction of mobile gaming makes it easier to launch different casino games from one’s desired location and convenience. Once users have every necessary internet connection, they can play their preferred games at the best casinos.
Most casinos make it easier for users to play with a few clicks by providing an online casino app. Smartphones, tablets, and other mobile devices are great tools to get these apps from operators. However, the most common casino apps are dedicated to iOS and Android devices. Players can launch any of their preferred games once they install the app.
Users can access games at the best casinos via optimized mobile browsers once connected to the internet or WiFi. All gamers have to do is create an account with any of the best online casino sites discussed and sign in to their accounts.
Best Android Apps (APK)


Types of Online Casinos Review
Everyone believes that an online casino has no form. Contrary to the wide belief, different types exist. Anyone who wants to learn betting must understand that it is crucial to learn before they start casino betting sites gambling. We will review the different types available to help you figure out which one will align with your gambling needs.
Offshore Casinos vs. Regulated Online Casinos
Online casinos are categorized into two, which are offshore casinos and regulated online casinos.
Offshore casinos operate on foreign soil. These types of casinos operate outside the law of a country. A regulated online casino provides a more legal operation, having completed all the essential paperwork, and certifications and has ticked all boxes to offer what bettors need:
Offshore online casinos. This type of online casino is famous for its top-ranking services. Gamers who play at offshore online casinos are exposed to lots of incentives that motivate them not only to be committed but also to invite others to play. This casino offers incredible rewards such as robust games, promotional offers, welcome bonuses, etc. They also offer more features than their regulated counterparts, but we must also state that they are not risk-free.
Authorities directly regulate this type of casino. This implies that users may enjoy limited protection should there be fraud, disputes, or gambling manipulations. Hence, gamblers must commit to reading deeper about these casinos before hitting the “join now” button at any offshore casino. Choose offshore casinos with proven security and fair play.
Regulated online casinos. Regulated casinos, unlike offshore casinos, are licensed. Authorities in the state oversee gambling affairs in their location of operation. Before they can operate, these casinos have to meet all requirements. This means players are fully protected and can enjoy casino games online.
Regular auditing is one of the tasks regulatory bodies carry out to ensure operators comply with casino gaming standards. They also enforce strict guidelines for maintaining a reliable and safe gaming environment. There are limited regulated online casinos in the United States, and not many of these states allow online casinos to operate. As such, there are only a few regulated casinos under the regulated category.
Stand-Alone Casinos vs. Gambling Sites
It is pertinent to find out if an operator is a stand-alone or part of a more comprehensive betting site. Their offer varies, which contributes more to betting.
The breakdown:
| Stand-alone Casinos | Gambling Sites |
|---|---|
| Stand-alone casinos offer more comprehensive casino games like slots, tables, and other casino games. They are more focused on making the environment a casino-like one, providing jaw-dropping and impressive perks. These services are designed to woo gamers and fulfill their needs. Gamers will find many casinos in this category that only focus on casinos and not sport betting virtual & casino. | Gambling sites, on the other hand, are the center of attraction in the gambling world as they offer impressive gaming experiences and sports betting casino services. Most of them also have poker rooms for experts to showcase their skills. Gambling sites target the largest audience and provide for their needs by accepting gamers who want to enjoy a variety of online gambling. For example, 1xbet, Betway, and Parimatch are some examples of sites that offer casino services and sports betting services. |
What are land-based casinos?
Online casinos are on the rise, but land-based have existed long ago and are still operating in most countries. Here is a review of land-based casinos.
Unlike online mobile casino, land-based casinos have been around longer before the introduction of online casinos. Almost all casino-legalized countries started with land-based casinos, for instance, the famous Las Vegas casinos in the United States and Macau. Land-based casinos are the ones gamers need to visit a building dedicated to before they can play.
They are brick-and-mortar establishments with several casino games you can also find at the new casino sites. Some conventional casinos offer sports betting services in shops or counters, allowing games to be staked on local and foreign sports. However, these casinos are famous for luxuries of different types. They are so glamorous that users can enjoy themselves with expensive foods, drinks, and more. Some casinos also allow players to lodge overnight.
Review of a short description of the most famous casino online
We will describe and review some famous casinos below.
1xBet
1xBet is one of the famous African casino operators, providing exceptional casino services. Available in Kenya and Nigeria. The casino has never stopped offering its fantastic services to gamblers since its inception. From jaw-dropping welcome offers to blockbuster casino slots, there is unlimited fun with the casino. The casino site compensates users with up to a 200% bonus on their first deposit. Moreover, users get 150 online casino free spins to try different slot games.
1xbets mobile app provides an unmatched casino betting experience for players, available for both iOS and Android devices. Gamers can install Android from the site’s homepage and iOS users from the App Store. With more than 3000+ casino games online on the site, no other casino comes closer regarding the game collection, making it the most reliable online casino.
Users are not stranded at the casino when they face any technical problem. The site has every necessary measure in place to sort out issues through its incredible support team. Users who find it hard to control betting casino urges can also use the site’s responsible gambling measures. Overall, experienced and inexperienced gamers will find all they need at 1xbet casino.
Betway
Although a foreign casino, Betway, is one of the leading casinos in Europe, the service extends to African countries such as Nigeria, South Africa, Kenya, etc. The casino offers games such as slots, table games, and poker. The casino offers more than 400 casino games online and a $1,500 bonus to new punters. From table games to poker and casino slots to roulette, Betway Casino has all game genres. Winnings at this casino don’t take longer, a feature casino enthusiasts love. Users enjoy maximum security at the site. All casino games online here are fair, with fantastic payouts.
Betway works flawlessly on both iOS and Android devices.
William Hill
William Hill is a globally famous top casino online. However, it is a British casino, and its services are cut across African nations like South Africa, Nigeria, Kenya, and other parts of the world. William Hill has friendly bonuses of up to 100% match deposit for players, exciting games, and an easy-to-use. The new casino site has a wide range of payment options for gamers to transact seamlessly.
888
Gambling online casinos will never be the same with 888 casinos, thanks to its top-notch services that keep players yearning for more. Its games libraries are from the best providers in the industry, including NetEnt, IGT, and more. There are also online casino slots and multiple payment options. With the $1000 welcome offer, gamers can explore all its casino games sections. 888 has a reliable support team that swings into action whenever a glitch occurs.
Mozzartbet
A sign-up at the Mozzartbet casino website means users will enjoy its 200% bonus. The Serbian-established casino has been around since 2001, extending its services to a few African countries. A robust games library is one of the qualities to enjoy here. The new Africa casino is fully licensed by MGA, which means players will enjoy maximum security, apart from its services like fantastic welcome offers, high payouts, support team, and more.
22Bet
22Bet has a wide range of services in different African countries. Gamers from Uganda, Nigeria, Kenya, Zimbabwe, and Ghana can enjoy its casino services. With several casino games online on the site, there is unlimited fun for casino enthusiasts. The Cyprus site features an online casino app for iOS and Android devices. The site offers a swift and easy sign-up process for gamers.
Parimatch
This international site, founded in 1994 in Cyprus, is available in different countries. Parimatch is available in Europe and many African countries like Nigeria, Kenya, Rwanda, Cameroon, Tanzania, Congo, etc. Its exclusive offers include up to a 150% welcome bonus. The site has an extensive casino games library, providing players with top-notch gaming moments, making it one of the best online casinos.
Betwinner
A staggering welcome offer is one of the unique features of this site. Moreover, gamers can access several eye-catching video slots and other casino games. The games are crafted by the best hands regarding software providers. Mobile app support, a responsive support team, a staggering welcome bonus, and other exclusive features are available at Betwinner.
Review of Gambling Laws and Authorities
Gambling laws are rules that strictly monitor the affairs of the gambling industry, including players and operators. Specific gambling laws bind players and casinos in any jurisdiction in which they operate. This review will reveal gambling laws and authorities for players.
Gambling Laws and authorities vary from country to country. A valid betting activity in one place may be prohibited in another jurisdiction. Each country has a unique law regulating gambling operations for players and casino online service providers. However, users must understand the law that guides them before attempting to gamble, whether online or offshore.
The gambling authorities are government agencies that oversee and regulate the betting practices of casinos. These affairs extend to geographical locations, particularly a state. They design some rules with strict penalties for casino operators or players who violate them. Each country’s legislature sets these policies, including the requirements and standards operators must meet before offering gambling services. Significant activities in these rules and requirements include game fairness, protection, and security, accounting systems, licenses, etc.
Review Gambling Taxation – Will players pay taxes on a winning ticket at the best casinos?
Taxes on winnings are decided using specific percentages. This review will discuss players and taxes on their winnings at the best casino site.
Almost all casino-legal countries answer to their government. As such, the government monitors the affairs of operators. Paying taxes on winning tickets depends on the government of a country. For example, the Kenyan government takes taxes from winning tickets. If a player wins casino betting, a percentage goes to the government.
This is legal according to the betting constitution of the country. A few years ago, there were amendments to the percentage of taxes that go to the government and the percentage of players’ profits. Tax collection on a winning ticket depends on the government of a country.
Problem Gambling
Gambling may result in serious addiction for players, especially if they notice certain acts. This review will be based on gambling traits to watch out for to know whether a player has a problem gambling at an old or a new casino online.
Gambling can be very fun and tricky! And even the most experienced gamblers can be tricked into falling victim to not knowing the right time to stop. The thrilling moments are endless, with bettors having one vital goal in mind; to win and win more.
This mindset towards betting may lead gamblers to be caught up in a nest of problem gambling. This is one of the reasons the best online
casinos will feature responsible gambling measures to prevent gamers from falling into the trap of problem gambling. If you experience any of these traits, a casino company says you may be having a problem gambling.
- Using money for other essential needs to gamble.
- Lying to relatives and friends about gambling.
- Gambling solely for financial gain.
- Not stopping when you reach limits.
Responsible Gambling for online casino betting
Gambling responsibly can prevent problem gambling. Some measures can help you keep off for some time. You will learn about responsible gambling in this casino review.
Some responsible gambling measures gamers would find on the best online casinos include self-exclusion, cool-off, time limits, and more. Users who find it difficult to reduce their playing time can also limit their time with play limits. With these features, players can see gambling as fun. If you notice you’re exhibiting any of these uncontrollable gambling behaviors, then it is time to embrace these measures to help you refrain from such acts.
- Never visit casinos with money meant for bills.
- Be open to anyone if you gamble at different casinos.
- Avoid playing at a casino site for financial income but for fun.
- Avoid gambling at casinos with drugs or drinks.
- Embrace the stop limit when things go sour.
- Don’t chase your losses.
Conclusion of the Best Online Casino Sites Review
Choosing the best online casino site should no longer be a rigorous exercise. Thanks to our practical knowledge, we sorted the best casinos for this month. Our above-recommended online casino list is licensed, tested, and trusted.
They offer everything you need to polish your casino gaming experience. However, players must avoid the mentioned casinos as they are below our best online casino reviews and performance ratings.
So remember these criteria for choosing the best online casino
Reputable Operation
If you are buying an item, you would want to read about the views of recent buyers to know if it is worthwhile. The same rule applies to choosing the best casino online. Reading about the review of an operator online is one of the best ways to gauge its performance and reputation. It will help you save your money from losing it to irreplaceable operators.
As such, read reviews, feedback, ratings, and other available ways to ensure player satisfaction. A positive and proven track record in casinos means you are dealing with the best. Find out about people’s experience patronizing such a product before you click that “sign-up” button and try to avoid any blacklisted operators.
Game fairness
Nobody would want to play at a site with unfair games, as fairness contributes to potential returns for gamers. Although this is another part of a casino’s reputation, it is worth paying attention to. A reputable operator will use random number generator (RNG) technology for games, including Casino Live. This will help to ascertain that players will enjoy fair and unbiased results when they play.
A site with game fairness means that the provider has passed through several thorough testing and have been certified by the perfect authorities. This means they meet the standards players crave. Different auditors are also responsible for ensuring fair play, such as eCOGRA.
Preferred Games
You may be playing at the wrong operator if you cannot find your choice of games there. This will make you continue losing money since you are playing games you don’t understand or like. Therefore, you must ensure that your operator offers the game you want to play, from slots to live casinos.
If you love casino slots, roulettes, poker, or other casino game genres and you cannot find any of these categories at your casino, it is a red flag for you. A diverse and robust library of games at a casino is one of the best features players consider before choosing them.
Multiple options to replenish your account
Gambling account replenishment is as crucial as other factors, except you don’t want to play for real cash. Don’t just make a gambling operator choice without digging deep into the payment options it offers.
It is pertinent to state that online casino payment methods can be location-restricted sometimes, so you must find out if the available payment options are acceptable in your region. Check if you can deposit and withdraw your winnings with available options. Some famous options include PayPal Casino Online. There is no essence of playing with cash and being unable to withdraw. Some common payment methods include cards, e-wallets, bank transfers, and more.
These options guarantee a quick payment for your casino betting accounts. They are also proven secure and prevent the unexpected, now and later. Most operators have also incorporated crypto casino payment in their systems. If you love transacting with this option, find out if it is available at your potential gambling operator.
Beyond Customer Service
Unfortunately, the best online casino will not narrow its customer support to only troubleshooting. Gamers must enjoy access to extra resources such as guides, FAQs, and other casino betting-related articles. This could be more helpful to players who are novices in gambling. These services must be available in players’ preferred language to help them understand better.
Ensure the Play Experience matches your need
You may find an operator boring if your play experience is far from what is expected. Hence, a need to find out if you will enjoy the best play experience before registering. Several factors can improve your play experiences, such as promotional offers, online live casino, and bonuses. Ensure to find out if a potential casino offers all related features that can help boost your bankroll, encouraging you to play longer.
Site Security
One may end up regretting for a long time playing at an insecure gambling site. Apart from losing one’s funds, third parties will easily manipulate one’s financial information, sometimes exposing you to fraud. As such, top online casinos would have passed all security tests, protecting users’ information from unauthorized or illegal access.
The best online casinos work on state-of-the-art security measures. Encrypted online casinos will not be vulnerable to cyber attacks, making it difficult for fraudsters to exploit users. Two-factor authentication is another key security to look for at a casino. It secures players’ accounts by requiring them to verify their login with a unique code.
Licensing
Do not mistake a casino site security feature for licensing, as they are different factors. A licensed casino may be deprived of security and vice versa. A licensed casino means nothing to worry about regarding meeting specific standards and regulations. Players can be assured of capability and legitimacy at their best.
If you play at an unlicensed casino, you may be endangering your financial details. Therefore, a license can help distinguish a risky casino from the best one. Some notable licensors include MGA, UKGC, Curacao, and more. Seeing a casino with a license from these authorities means you are safe.
Problem Gambling
Gambling online casino is fun; apart from momentary returns, players enjoy playing their favorite game online. Players may be lost in the bid to win more, win more, and win more. To prevent these uncontrollable gambling practices, the best online casino would feature problem gambling on its website.
This reality check will ensure that users are playing within the right limit. The best casinos have featured fantastic measures to curb excessive gambling, such as cool-off periods and play limits.
Self-exclusion is another common problem gambling measure that allows players to refrain from gambling for a certain period. These virtual safety nets keep players within the right betting casino practices. So you must choose the best operator with this feature to sign up with.
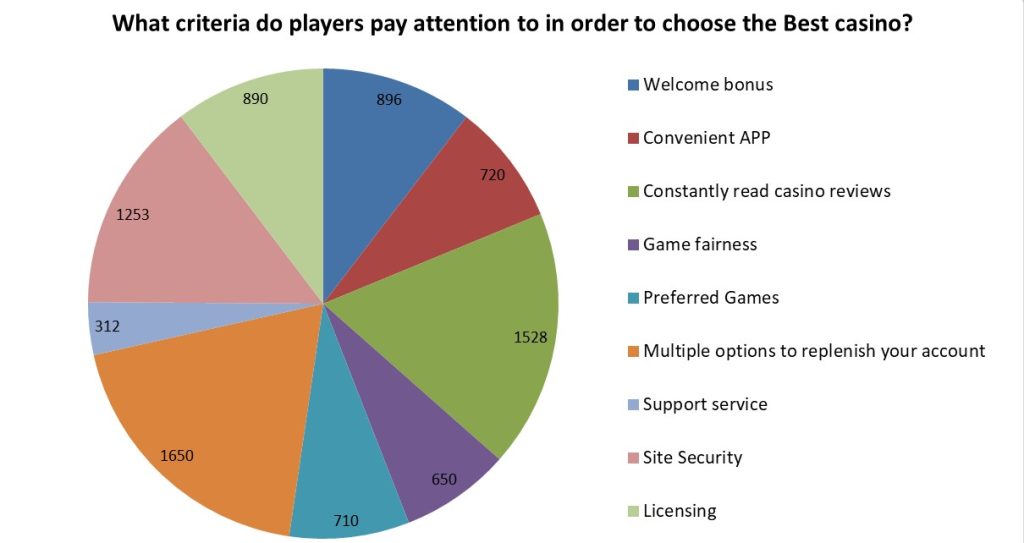
Survey results
We also conducted a survey among readers of our site: what criteria do players pay attention to in order to choose the best casino? More than 7,000 people accepted to study in the survey. Each person could choose a maximum of 3 answer options. Here are the survey results:
FAQs
Where can I find the best online casinos?
What top casino online games are popular?
How do I replenish my account and cash out at online casinos?
Can I play on my mobile device?
What is a welcome bonus, and how do I claim it?
Do I have to play for real money?
Which online casino offers the most games?
Will I need to pay tax on my winnings?
How can I check if my country legalizes online casinos?